Sattu Paratha

Stuffed Sattu Paratha: A Delectable and Nutritious Delight

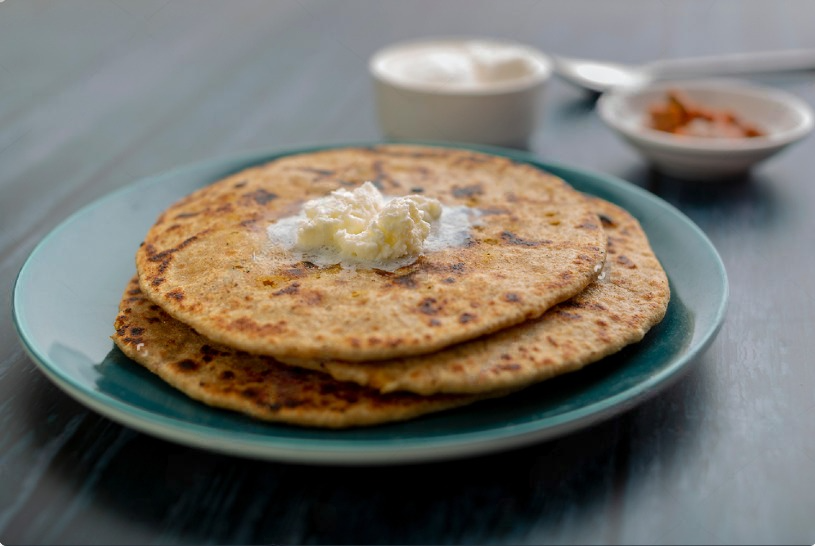
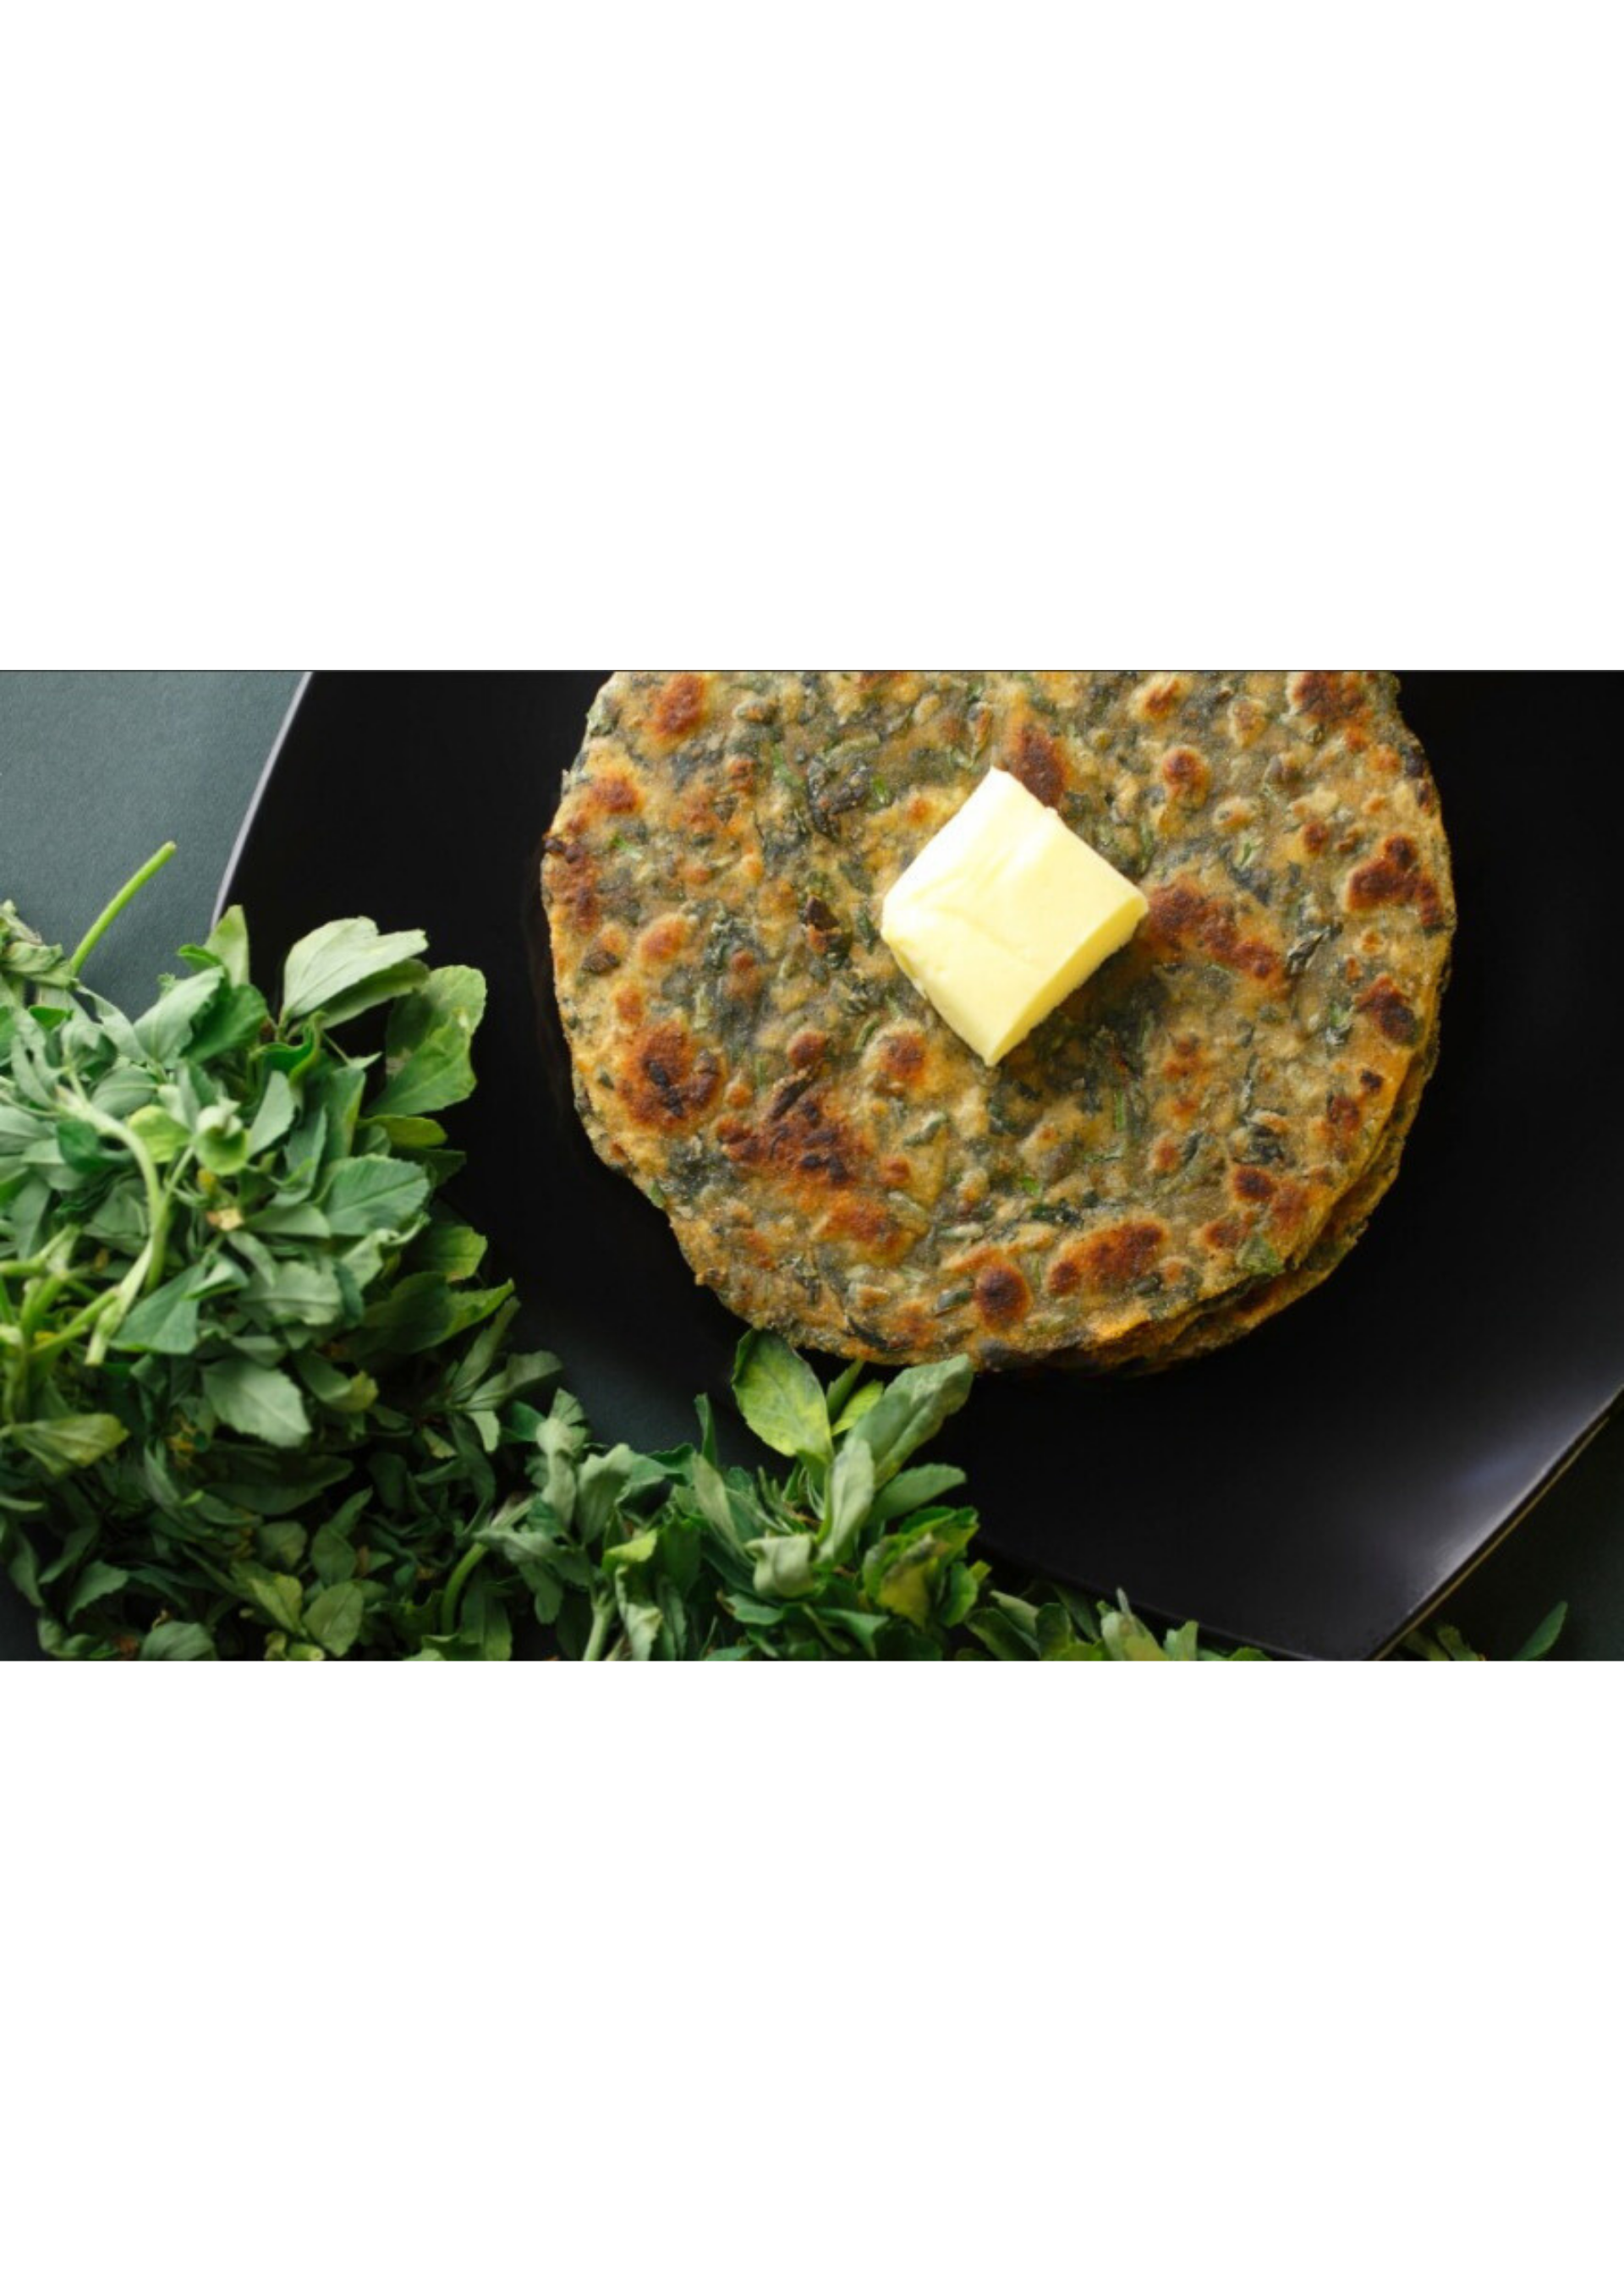
About Stuffed sattu paratha is a beloved classic in North Indian cuisine. This flavorful and wholesome dish features a soft, flaky paratha (flatbread) wrapped around a savory filling made from roasted gram flour (sattu). Sattu stuffed parathas are a popular breakfast, snack, or accompaniment to any meal. Recipe and Method: To make stuffed sattu  parathas, you’ll need the following ingredients: For the dough: – 2 cups whole wheat flour – 1/2 tsp salt – 1/4 cup water For the sattu filling: – 1 cup sattu (roasted gram flour) – 1 tsp cumin powder – 1 tsp coriander powder – 1 tsp red chili powder – 1 tsp mango powder (amchur) – 1 tsp salt – 2 tbsp finely chopped onions – 2 tbsp finely chopped cilantro – Ghee or oil for cooking Instructions: Make the dough by mixing the whole wheat flour and salt. Gradually add water and knead into a smooth, pliable dough. Cover and set aside for 30 minutes. In a bowl, mix together all the ingredients for the sattu filling. Divide the dough into lemon-sized balls. Roll each ball into a circular shape, place a few tablespoons of the sattu filling in the center, and gather the edges to seal the paratha. Heat a griddle or tawa and cook the stuffed paratha on both sides, drizzling ghee or oil as needed, until golden brown and crisp. Serve the hot, flaky stuffed sattu  parathas with accompaniments like pickle, curd, or your choice of chutney. Nutritional Benefits: Stuffed sattu  parathas are not only delicious but also highly nutritious. Here’s a breakdown of their key nutritional values: – Sattu (roasted gram flour) is rich in protein, fiber, minerals like iron, and B vitamins. It helps promote digestive health and regulate blood sugar levels. – Whole wheat flour used for the paratha dough is a good source of complex carbohydrates, fiber, and various vitamins and minerals. – Spices like cumin, coriander, and chili powder add anti-oxidants, anti-inflammatory properties, and boost metabolism. – The addition of onions and cilantro provides vitamin C, folate, and other beneficial plant compounds. Altogether, stuffed sattu  parathas offer a balanced combination of complex carbs, protein, fiber, and micro-nutrients, making them a wholesome and satisfying meal. In conclusion, stuffed sattu  parathas are a delightful and nourishing Indian delicacy that combines the goodness of roasted gram flour, whole wheat, and aromatic spices. Whether enjoyed for breakfast, as a snack, or alongside a meal, this versatile dish is sure to delight your taste buds while providing valuable nutrients to your body. FAQs: Can I use pre-made paratha dough? Yes, you can use store-bought or pre-made paratha dough to save time. Just divide the dough, stuff it with the sattu filling, and cook as per the recipe. Is sattu suitable for weight loss? Yes, sattu is an excellent ingredient for weight management. It is low in calories, high in fiber, and helps keep you feeling full for longer, aiding in portion control. Can I bake the stuffed sattu  parathas instead of frying? Absolutely! To bake, place the stuffed parathas on a greased baking sheet and bake at 375°F (190°C) for 15-20 minutes, flipping halfway, until golden brown. How long do sattu stuffed parathas stay fresh? Freshly made parathas can be stored at room temperature for up to 2 days. For longer storage, refrigerate them in an airtight container for up to 4-5 days. Can I make the sattu filling ahead of time? Yes, the sattu filling can be prepared a day in advance and stored in the refrigerator. This makes the paratha assembly process quicker on the day of serving.   Written By:- Amisha

Vedsure2024
Paneer bhurji

Paneer Bhurji: A Delectable Vegetarian Delight

About Paneer Bhurji is a popular Indian vegetarian dish that has gained widespread popularity across the globe. This versatile recipe combines the goodness of fresh paneer (cottage cheese) with a flavorful blend of spices, creating a delectable and nourishing meal. Method: Ingredients: 200g paneer, crumbled 2 tablespoons oil 1 onion, finely chopped 2 tomatoes, finely chopped 2 green chilies, finely chopped 1 teaspoon gingergarlic paste 1 teaspoon cumin powder 1 teaspoon coriander powder 1/2 teaspoon turmeric powder 1/2 teaspoon red chili powder (or to taste) Salt to taste 2 tablespoons chopped coriander leaves Preparation: Heat the oil in a nonstick pan over medium heat. Add the chopped onions and sauté until they turn translucent. Add the gingergarlic paste and green chilies, and sauté for a minute. Next, add the chopped tomatoes and cook until they become soft and pulpy. Stir in the spices (cumin powder, coriander powder, turmeric powder, and red chili powder) and mix well. Crumble the paneer and add it to the pan, gently mixing it with the spiced oniontomato mixture. Cook for 57 minutes, stirring occasionally, until the paneer is well incorporated and the flavors have blended together. Finally, add the chopped coriander leaves and give it a final mix. Benefits of Paneer Bhurji: Nutritional Value: Paneer is a rich source of protein, calcium, and other essential nutrients. The combination of paneer, vegetables, and spices in Paneer Bhurji provides a wellbalanced and nourishing meal. Digestibility: Paneer is easy to digest, making it a suitable option for those with sensitive stomachs. The inclusion of spices and vegetables aids in improving digestion. Versatility: Paneer Bhurji can be served as a main dish, side dish, or even as a filling for wraps and sandwiches. It can be enjoyed with roti, paratha, or even rice dishes. Vegetarian Protein Source: For vegetarians and vegans, Paneer Bhurji offers a convenient and delicious source of protein. It can be a satisfying alternative to nonvegetarian dishes. Paneer Bhurji is a delightful vegetarian dish that offers a delectable blend of flavors and nutrients. With its versatility, ease of preparation, and health benefits, it’s no wonder it has become a beloved staple in many households. Whether you’re a seasoned cook or a beginner, this recipe is sure to impress and satisfy your taste buds. Nutritional Value: Per 100g serving: Calories: 260 Total Fat: 18g Saturated Fat: 11g Cholesterol: 80mg Sodium: 430mg Total Carbohydrates: 8g Dietary Fiber: 1g Protein: 19g Calcium: 300mg Iron: 1mg FAQs: 1. Can I use frozen paneer for Paneer Bhurji? Yes, you can use frozen paneer. However, it’s best to thaw it before use to ensure a better texture. 2. How can I make Paneer Bhurji healthier? Use less oil and opt for healthier cooking methods like grilling or baking the paneer. Increase the proportion of vegetables like spinach, bell peppers, or peas. Reduce the amount of spices or use low sodium versions. 3. Can I make Paneer Bhurji in advance? Yes, Paneer Bhurji can be made in advance and stored in the refrigerator for up to 34 days. Reheat it gently before serving, and you may need to add a bit of water or milk to maintain the desired consistency. 4. What can I serve with Paneer Bhurji? Paneer Bhurji pairs well with various Indian breads like roti, paratha, or naan. It can also be served with rice dishes, such as jeera rice or biryani. For a complete meal, you can serve it with a side salad or raita (yogurt based condiment). 5. Can I make Paneer Bhurji vegan? To make a vegan version, you can substitute paneer with firm tofu or soy based paneer alternatives. Adjust the spices and seasonings to suit your preferences.   Written By:- Amisha  

Vedsure2024
methi matar

Best Methi Matar Protein Curry

About Methi matar malai is healthy and nutritious, featuring the beneficial properties of fenugreek leaves and green peas. The creamy sauce is made with low-fat dairy or plant-based milk, making it a light yet flavorful curry. Also by adding tofu or paneer to it we make it rich in protein Enjoy it with steamed basmati rice or naan bread. Ingredients: – 1 cup fresh methi (fenugreek) leaves, washed and chopped – 1 cup fresh green peas (or frozen, thawed) – 1 block (200g) extra-firm diced tofu/ paneer – 2 tablespoons olive oil – 1 onion, finely chopped – 3 cloves garlic, minced – 1-inch ginger, grated – 1 teaspoon cumin seeds – 1 teaspoon coriander powder – 1 teaspoon garam masala – 1/2 teaspoon turmeric powder – 1/2 teaspoon red chili powder – Salt to taste – 1/2 cup unsweetened almond milk/ soya milk Nutritional Info per Serving: – Calories: 184 – Protein: 13g – Carbs: 12g – Fiber: 5g – Fat: 10g Nutritional Info per Serving (with coconut milk): – Calories: 227 – Protein: 13g – Carbs: 12g – Fiber: 5g – Fat: 16g Method: In a large skillet, heat the olive oil over medium heat. Add the cumin seeds and let them sizzle for 30 seconds until fragrant. Add the chopped onion and sauté for 5-6 minutes until translucent. Then add the minced garlic and grated ginger. Sauté for 2 more minutes. Add the chopped methi leaves and green peas. Sauté for 3-4 minutes until the methi leaves are wilted. Add the coriander powder, garam masala, turmeric, red chili powder and salt. Mix well and let the spices cook for 2 minutes. Next, add the diced tofu and almond milk. Gently stir to combine everything. Simmer for 8-10 minutes, allowing the flavors to meld. Adjust seasoning if needed. Serve hot with brown rice or quinoa. Dairy-Free Alternative for methi matar: For a completely dairy-free version, replace the almond milk with full-fat coconut milk. This will add a rich, creamy texture without the dairy. Methi matar protein curry is a delicious, nutritious and weight-loss friendly version of the classic Indian dish. By using protein-rich tofu instead of heavy cream, it cuts the calories and fat while still delivering big flavor. The addition of fresh methi leaves and green peas provides excellent fiber and nutrient content. This versatile curry can easily be adapted to suit different dietary needs and preferences. FAQs: Q: Why use tofu instead of malai (cream)? A: Traditional methi matar malai uses heavy cream or cashew cream, which adds a lot of calories and fat. Tofu is a great alternative that provides protein without the high calorie and fat content. It also makes this dish more weight-loss friendly. Q: Can I use a different protein source? A: Absolutely. You can use diced chicken breast or shrimp instead of tofu if you prefer. Just adjust the cooking time accordingly. Chickpeas or lentils are other protein-rich options. Q: Is this recipe suitable for vegetarians/vegans? A: Yes, this recipe is vegetarian and can easily be made vegan by using the dairy-free coconut milk version. Q: How can I increase the fiber in this dish? A: You can add more methi leaves, as they are high in fiber. You can also include some chopped spinach or other leafy greens. Serving it with a side of brown rice or quinoa will also boost the fiber. Q: Is this recipe good for weight loss? A: Yes, methi matar protein curry recipe is a great option for weight loss. It’s high in protein and fiber, but relatively low in calories and fat compared to the traditional version. The protein from the tofu will help keep you feeling full and satisfied. Q: Can I make this ahead of time? A: Absolutely. This curry actually improves in flavor after a day or two in the fridge. It will keep well for 3-4 days stored in an airtight container. Q: What can I serve this with? A: Basmati rice, quinoa or a whole grain roti/naan make great accompaniments. You can also serve it with a fresh green salad for added nutrients.   Written By:- Amisha

Vedsure2024
gluten-free

Gluten-Free Methi Parantha

About Methi Parantha is a delicious Indian flatbread made with fenugreek leaves (methi) and flour but here’s a recipe  gluten-free methi parantha recpie for those parantha loves who have gluten intolorence. Here’s a recipe for how to make methi parantha: Ingredients: – 1 cup gluten-free flour (a mix of bajra, ragi, and rice flour) – 1 cup finely chopped fresh methi (fenugreek) leaves – 1 tsp cumin seeds – 1 tsp coriander seeds – 1 green chili, finely chopped – 1 tbsp grated ginger – 1 tbsp lemon juice – Salt to taste – Water as needed – Ghee or oil for cooking Method: In a mixing bowl, combine the gluten-free flour, chopped methi leaves, cumin seeds, coriander seeds, green chili, grated ginger, lemon juice, and salt. Mix well. Slowly add water and knead to form a soft, pliable dough. Cover and let it rest for 15-20 minutes. Divide the dough into lemon-sized balls. Roll each ball into a thin circle using a rolling pin. Heat a non-stick tawa or griddle and cook the parantha on both sides, drizzling a little ghee or oil, until golden brown spots appear. Serve hot with a side of low-fat raita or any other healthy accompaniment. Nutritional Value (per serving): – Calories: 180 kcal – Carbohydrates: 27g – Protein: 6g – Fat: 6g – Fiber: 4g Certainly, let me provide the benefits of using gluten-free flours and incorporating methi (fenugreek) in this recipe before discussing the nutritional value. Benefits of Gluten-Free Flours: – Suitable for individuals with celiac disease or gluten intolerance, as these flours are naturally free of gluten. – Bajra and ragi are both high in fiber, which can promote feelings of fullness and aid in weight management. – These gluten-free flours are also rich in essential minerals like iron, calcium, and magnesium, which are important for overall health. – The use of a flour blend, rather than a single gluten-free flour, helps create a more balanced nutritional profile and improves the texture of the parantha. Benefits of Methi (Fenugreek) Leaves: – Methi leaves are a rich source of dietary fiber, which can help regulate bowel movements and improve digestion. – They contain a compound called 4-hydroxyisoleucine, which has been shown to help regulate blood sugar levels, making this recipe suitable for individuals with diabetes. – Methi leaves are also a good source of vitamins, particularly vitamins A, C, and K, as well as minerals like iron, calcium, and potassium. – The bitter taste of methi leaves can help stimulate the production of digestive juices, aiding in the overall digestive process. – Methi leaves have anti-inflammatory properties and may help reduce the risk of certain chronic diseases. This balanced nutritional profile, with a focus on high-fiber, gluten-free ingredients and the inclusion of methi leaves, makes this recipe a healthy and weight-loss friendly option. FAQs: Can I use any other gluten-free flour instead of the mix? Yes, you can use 100% bajra flour or ragi flour if preferred. The mix of flours provides a balanced nutritional profile. How can I make this recipe more weight-loss friendly? To make this recipe more weight-loss friendly, you can: – Use less oil or ghee for cooking – Serve it with a low-calorie, high-fiber vegetable raita – Pair it with a light, protein-rich side dish like grilled chicken or roasted vegetables Is this recipe suitable for diabetics? Yes, this recipe is suitable for diabetics as it is made with gluten-free, high-fiber flours like bajra and ragi. The addition of methi leaves also helps regulate blood sugar levels. Can I make the parantha dough in advance? Yes, you can make the parantha dough in advance and store it in the refrigerator for up to 3 days. When ready to use, let it come to room temperature before rolling and cooking.   Written By:- Amisha

Vedsure2024
hummus

3 type of hummus recpies

Hummus Middle Eastern countries including Egypt, Lebanon, Syria, and Israel all claim hummus as part of their culinary traditions. It’s gained global popularity in the last few decades.Hummus is regarded as a satiating and healthful appetiser or snack. It has a lot of fiber, protein, good fats, and several vitamins and minerals.A common Middle Eastern dip or spread, hummus is made with crushed sesame seeds, olive oil, lemon juice, garlic, and chickpeas, often called garbanzo beans. Classic Chickpea Hummus: Method: Soak 1 cup of dried chickpeas (also called garbanzo beans) overnight. Drain and rinse. In a pot, cover the chickpeas with water and bring to a boil. Reduce heat and simmer for 45-60 minutes until very soft. Drain the cooked chickpeas and reserve 1/4 cup of the cooking liquid. In a food processor, blend the chickpeas, 1/4 cup tahini (sesame seed paste), 2 tbsp lemon juice, 2 garlic cloves, 1/2 tsp cumin, and 1/4 cup of the reserved cooking liquid until smooth and creamy. Season with salt and pepper to taste. Drizzle with olive oil and sprinkle with paprika before serving. Benefits: Chickpeas are an excellent source of plant-based protein, fiber, complex carbs, and various vitamins and minerals like folate, iron, and magnesium. Tahini provides healthy fats from sesame seeds. Nutrition (per 2 tbsp serving): Calories 94, Fat 6g, Carbs 8g, Fiber 2g, Protein 3g Roasted Red Pepper Hummus: Method: Roast 2 red bell peppers over an open flame or under a broiler until charred on all sides. Let cool, then peel, seed, and chop. In a food processor, blend the roasted peppers, 1 can (15oz) of drained and rinsed chickpeas, 1/4 cup tahini, 2 tbsp lemon juice, 2 garlic cloves, 1 tsp cumin, and 2-3 tbsp water until smooth. Season with salt and pepper to taste. Drizzle with olive oil and sprinkle with smoked paprika before serving . Benefits: Roasted red peppers add a sweet, smoky flavor and antioxidants like vitamin C. The creaminess of hummus makes it a nutritious and satisfying dip or spread. Nutrition (per 2 tbsp serving): Calories 100, Fat 6g, Carbs 9g, Fiber 2g, Protein 3g Edamame Hummus: Method: Bring a pot of salted water to a boil. Cook 1 cup of frozen shelled edamame for 3-5 minutes until tender. Drain and let cool. In a food processor, blend the cooked edamame, 1/4 cup tahini, 2 tbsp lemon juice, 1 garlic clove, 1/2 tsp ground cumin, and 2-3 tbsp water until smooth and creamy. Season with salt and pepper to taste. Garnish with toasted sesame seeds, chopped cilantro, and a drizzle of olive oil. Benefits: Edamame is a great source of plant-based protein, fiber, and antioxidants like vitamin K and folate. This twist on classic hummus provides a vibrant green color and fresh, sweet flavor. Nutrition (per 2 tbsp serving): Calories 90, Fat 6g, Carbs 5g, Fiber 2g, Protein 4g FAQs: – Can I use canned or frozen edamame? Yes, either of those work well. Just be sure to cook the frozen edamame first. – How long will the edamame hummus keep? It will last 4-5 days stored airtight in the refrigerator. – What can I serve edamame hummus with? It’s delicious with pita bread, veggies, crackers, or as a sandwich spread. – Can I use canned chickpeas? Yes, you can use 1 can of chickpeas. Drain and rinse before using. – How long will hummus keep? Stored in an airtight container in the fridge, it will last 4-5 days. – Can I freeze hummus? Yes, it freezes well for 2-3 months. Thaw in the fridge before serving. – Can I use jarred roasted peppers? Yes, that works too. Use about 1/2 cup chopped. – How spicy is this hummus? The roasted peppers add a mild sweetness, not much heat. Adjust spice with cayenne if desired. – How long will the hummus keep? It will last 4-5 days stored airtight in the fridge.   Written By:- Amisha  

Vedsure2024